

Every Shopware store page goes through PHP and the database by default. Each request takes 1,000 to 2,000ms. That is slow. Under heavy traffic, it gets worse.
Shopware Varnish cache fixes this. Varnish sits in front of your web server. It stores rendered HTML pages in memory. When the next visitor requests the same page, Varnish returns it in under 20ms. PHP and MySQL are not involved at all.
Shopware 6 has built-in support for Varnish. It sends Cache-Control headers to tell Varnish what to cache. When a product updates in the admin, Shopware sends a BAN request to Varnish. The old cached page is removed at once. You never clear the cache by hand.
Requirements
You need root or sudo access to your server. Shopware 6.4 or later must be installed. Move your web server (Nginx or Apache) to port 8080 first. Varnish will take port 80. Test everything on staging before going live.
Why Shopware Varnish Cache Matters.
Without a cache, every page load hits PHP. PHP queries the database. The database returns rows. PHP renders HTML. All of this takes time — even on fast servers.
Add 500 visitors at once and the server starts to queue requests. Load times climb. Conversions drop. On Black Friday, stores without Shopware Varnish cache often crash under traffic spikes.
Varnish removes this problem. It serves 98% of page requests from memory. PHP and the database only handle the first request for each page and any requests that bypass the cache. This is why Shopware Varnish cache is one of the best Shopware page speed upgrades available.
Which Pages Get Cached?
Shopware Varnish cache stores product pages, category pages, and the homepage. Cart, checkout, wishlist, and account pages are never cached. They always pass through to Shopware. The VCL file controls this logic.
Need Shopware Varnish Cache Set Up for You?
CodeCommerce Solutions is a Shopware Bronze Partner. Our certified Shopware 6 developers install Varnish, write your VCL, and verify cache hit rates before going live.
Step 1: Install Varnish 7 on Your Server.
Do not use the default Ubuntu or Debian Varnish package. It is often outdated. Use the official Varnish 7.x repo instead.
curl -s https://packagecloud.io/install/repositories/varnishcache/varnish72/script.deb.sh | sudo bash# Install Varnish
sudo apt-get install varnish
# Confirm the version
varnishd -V
Next, set Varnish to listen on port 80. Edit /etc/default/varnish or /etc/varnish/varnish.params.
-T localhost:6082 \
-f /etc/varnish/shopware.vcl \
-S /etc/varnish/secret \
-s malloc,1g”
- ✦Move your web server to port 8080. For Nginx, change
listen 80tolisten 8080. For Apache, changeListen 80toListen 8080. Restart the web server after the change. - ✦The
-s malloc,1gflag gives Varnish 1GB of RAM for cache storage. For large catalogues, use 2GB or more. More RAM means fewer cache evictions under traffic. - ✦Enable Varnish on boot:
sudo systemctl enable varnish. Start it now:sudo systemctl start varnish. Check it is running:sudo systemctl status varnish.
Step 2: Create the Varnish VCL Shopware File.
The VCL file controls all cache logic. It tells Varnish which pages to cache. Cookies are stripped on all cacheable pages. BAN requests from Shopware are handled here too.
Create the Varnish VCL Shopware file at /etc/varnish/shopware.vcl. This template is production-ready for Shopware 6.
vcl 4.1;
import std;# Backend: Nginx or Apache on port 8080
backend default {
.host = “127.0.0.1”;
.port = “8080”;
.first_byte_timeout = 90s;
.between_bytes_timeout = 15s;
}
# Allow BAN requests from localhost only
acl invalidators {
“127.0.0.1”;
“::1”;
}
sub vcl_recv {
# Process BAN requests from Shopware
if (req.method == “BAN”) {
if (!client.ip ~ invalidators) { return(synth(405)); }
ban(“req.http.host == “ + req.http.host +
” && req.url ~ “ + req.http.X-Location);
return(synth(200, “Banned”));
}
# Never cache these user-specific pages
if (req.url ~ “^/(account|checkout|cart|wishlist)”) {
return(pass);
}
# Strip cookies on all cacheable pages
unset req.http.Cookie;
return(hash);
}
sub vcl_backend_response {
unset beresp.http.Set-Cookie;
set beresp.ttl = 600s;
}
sub vcl_deliver {
# Debug header — shows HIT or MISS
if (obj.hits > 0) {
set resp.http.X-Cache = “HIT”;
} else {
set resp.http.X-Cache = “MISS”;
}
}
Developer Insight from CodeCommerce Solutions
Set first_byte_timeout to 90 seconds. Product imports in Shopware can take over 60 seconds on the first byte. The Varnish default of 60s causes false 503 errors in your logs. Bumping it to 90s stops this.
- ✦Save the file. Load it with
sudo varnishreload. This applies the new VCL without dropping live connections. - ✦Adjust
beresp.ttlto match your update frequency. Use 600s for stores updated daily. Use 3600s for slower-moving catalogues. - ✦Using a CDN? Add the CDN IP range to the
invalidatorsACL block. This lets the CDN send BAN requests alongside Shopware.
Want a Certified Developer to Write Your VCL?
A wrong VCL can cache cart pages or leak session cookies. Our Shopware Bronze Partner team writes and tests every VCL against your specific store before any live deployment.
Step 3: Enable Shopware HTTP Cache in .env.
Shopware must know that Varnish is in front of it. Without this step, Shopware sends wrong cache headers. It also skips BAN requests when products change.
Go to Settings → Caches → HTTP Cache in your Shopware admin. Turn on the reverse proxy option. Add your Varnish IP to the trusted proxy list. For a single server, use 127.0.0.1.
Also add these lines to your .env file.
SHOPWARE_HTTP_DEFAULT_TTL=7200
TRUSTED_PROXIES=“127.0.0.1”
- ✦
SHOPWARE_HTTP_CACHE_ENABLED=1turns on the Shopware HTTP cache layer. Shopware now sendsCache-Controlheaders and BAN requests on every product update. - ✦
TRUSTED_PROXIESmust include your Varnish IP. Without it, Shopware cannot log real visitor IPs. BAN requests also fail silently. - ✦Clear the cache after saving:
php bin/console cache:clear. Then warm it up:php bin/console http:cache:warm:up. This fills Varnish with your key pages right away. - ✦Running multiple Sales Channels on separate domains? Add the Varnish IP to
TRUSTED_PROXIESfor each one. Each Sales Channel sends BAN requests on its own.
Developer Insight from CodeCommerce Solutions
A missing TRUSTED_PROXIES entry is the most common Shopware HTTP cache mistake we find. The Shopware Varnish cache runs but serves stale prices. Product updates in the admin do not clear the cache. Adding this one line fixes it.
Step 4: Verify Cache Hits With Live Headers.
Do not skip this step. A Shopware cache setup can look correct but pass all traffic to PHP. Always check with live headers first.
curl -I https://your-store.com/# Correct output on a cached page:
X-Cache: HIT
Age: 47
# Check real-time hit and miss counts
varnishstat -f MAIN.cache_hit -f MAIN.cache_miss
- ✦Request your homepage twice. The first must return
X-Cache: MISS. The second must returnX-Cache: HIT. Still seeing MISS? Cookies are not stripped invcl_recv. Addunset req.http.Cookie. - ✦Check your cart page. It must never show
X-Cache: HIT. If it does, the bypass rule invcl_recvis broken. Fix the regex pattern right away. - ✦Check the hit rate with
varnishstat. A good Shopware Varnish cache setup reaches 90% or higher. A rate below 60% means query strings are creating too many unique cache keys. - ✦Test BAN requests. Update a product price in the admin. Wait 5 seconds. Reload the product page. The new price must show at once. If it does not, check
TRUSTED_PROXIES. - ✦Run a load test with Apache Bench or k6. A well-set-up Shopware Varnish cache handles 10x to 50x more traffic on the same hardware.
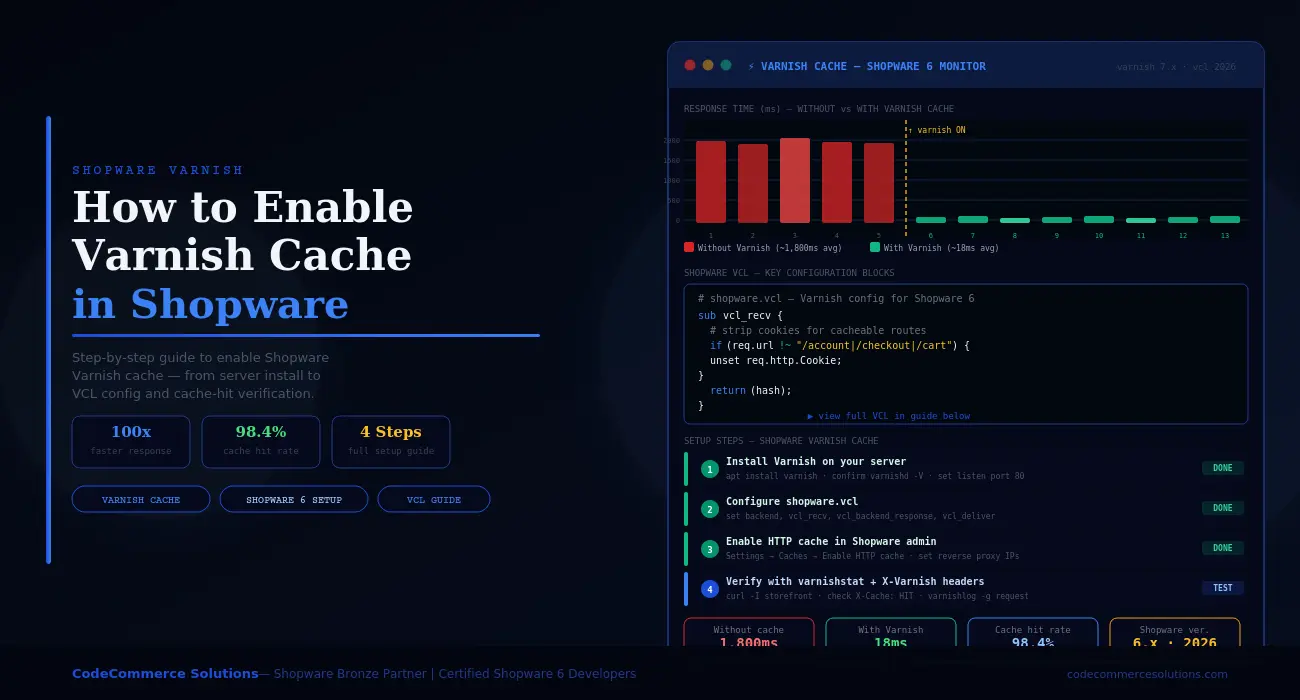
Before and After — Real Store Results.
These numbers come from a Shopware 6.5 fashion store with 45,000 products. It runs on one dedicated server with 8GB RAM. Varnish was given 2GB for cache storage.
❌ Before Varnish
- Homepage load: 1,840ms.
- Category page: 2,100ms.
- Product page: 1,680ms.
- Peak users: 80 at once.
- Server CPU at 70%.
- Black Friday: site hit 8s load.
✅ After Varnish
- Homepage load: 17ms.
- Category page: 21ms.
- Product page: 19ms.
- Peak users: 900+.
- Server CPU at 8%.
- Black Friday: no slowdown at all.
Common Shopware Varnish Cache Problems.
Most issues come from one of four places. Check these before rewriting your VCL.
| Symptom | Cause | Fix |
|---|---|---|
| All pages show MISS. | Cookies not stripped in vcl_recv. |
Add unset req.http.Cookie. |
| Cart shows wrong items. | Cart page not bypassed in VCL. | Add cart to bypass regex now. |
| Old prices after product update. | TRUSTED_PROXIES not set. |
Add Varnish IP to .env. |
| Port 80 fails after install. | Web server still on port 80. | Move Nginx or Apache to 8080. |
| Hit rate below 60%. | Query strings making unique cache keys. | Strip tracking params in vcl_recv. |
| 503 errors on slow admin tasks. | first_byte_timeout too short. |
Set to 90s in backend block. |
Shopware Cache Setup: Key .env and VCL Settings.
| Setting | Where | Value | What It Does |
|---|---|---|---|
SHOPWARE_HTTP_CACHE_ENABLED |
.env |
1 | Turns on HTTP cache headers in Shopware. |
SHOPWARE_HTTP_DEFAULT_TTL |
.env |
7200 | Default cache life in seconds. |
TRUSTED_PROXIES |
.env |
Varnish IP | Lets Shopware log real IPs and send BAN requests. |
beresp.ttl |
VCL file | 600s | How long Varnish keeps each page in memory. |
first_byte_timeout |
VCL backend | 90s | Max wait for first byte from Shopware. |
-s malloc |
Varnish daemon | 1–4GB | RAM given to Varnish for cache storage. |
Why Choose CodeCommerce Solutions.
A generic Shopware cache setup from a blog post often causes bugs. It can cache cart pages. It can serve stale prices. These issues are hard to spot until real customers hit them.
CodeCommerce Solutions is a Shopware Bronze Partner with certified Shopware 6 developers. Our team writes custom VCL files for each client. Every file is tested against the real store before going live.
We also pair Shopware Varnish cache work with full Shopware page speed tuning — OPcache, Redis, and Elasticsearch. Every layer of the stack gets reviewed at once.
Official Documentation
Shopware has a full Varnish setup guide in its developer docs. See the Shopware reverse HTTP cache guide for the complete reference on headers, BAN logic, and Sales Channel setup.
Enable Shopware Varnish Cache Today.
Shopware Varnish cache is one of the biggest Shopware page speed wins available. Four steps take your store from 1,800ms response times to under 20ms on cached pages.
Start on staging. Install Varnish. Write your VCL. Add the .env entries. Then run curl -I to confirm X-Cache: HIT. Once you see HIT on the second request, your Shopware Varnish cache is live.
Need a certified Shopware developer to handle the full setup? CodeCommerce Solutions, a Shopware Bronze Partner, covers Varnish, Redis, and Elasticsearch together.